Node.js & ASP.NET Core 1.0: A Usage Comparison - Part 4: Cross-Origin Resource Sharing


Welcome back to the fourth part of the series! Don't forget that everything explained in this post can be seen in the open-source GitHub project. The post itself contains important code pieces only.
Same Origin Policy
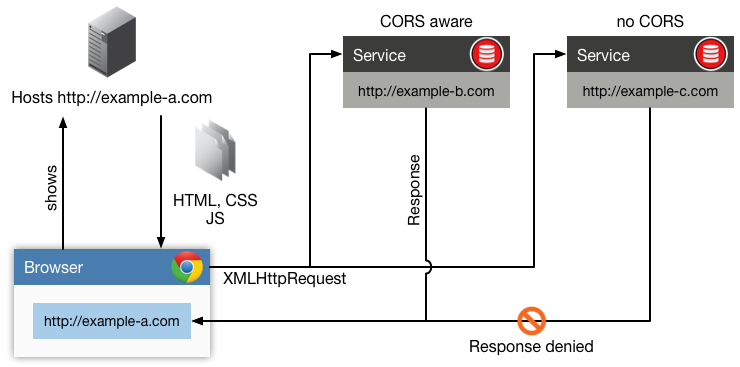
For security reasons, the browser blocks all requests from within a document or script which are not sent to the same domain it is currently being served from. This is the so called Same Origin Policy (SOP):
The same-origin policy restricts how a document or script loaded from one origin can interact with a resource from another origin. It is a critical security mechanism for isolating potentially malicious documents.
With this restriction it's not possible to access data hosted on other domains.
Cross-Origin Resource Sharing
This is where Cross-Origin Resource Sharing (CORS) comes into the place. MDN has a clean description for CORS:
A resource makes a cross-origin HTTP request when it requests a resource from a different domain than the one which the first resource itself serves. For example, a HTML page served from http://domain-a.com makes an
<img>src request for http://domain-b.com/image.jpg. Many pages on the web today load resources like CSS stylesheets, images and scripts from separate domains.
This is especially true, if you think of JavaScript-based clients running in a browser utilizing different Web APIs - or even 3rd party Web APIs - to show data to the user. To request the data, the clients sends a XMLHttpRequest to a Web API which holds data the clients want's to get. If the request tries to access another host - which does not use CORS - the browser will deny the request due to SOP with a message like this:

Not something we want for clients using our Web APIs. ;-)
CORS headers
To actually use CORS, we need to tell the browser that the request he made to our Web API is allowed. To do that we need to add a set of HTTP response headers in our Web APIs:
Access-Control-Allow-Origin: <origin> | *: Theoriginis an URI which will access our Web API. You can use a wildcard*to allow all origins.Access-Control-Expose-Headers: <field-name>[, <field-name>]*: Specified which custom headers are exposed to the browser and therefore can be accessed by a client. In this case the syntax[, <field-name]*means 0 to unlimited field names separated by a comma.
In case of CORS preflight requests, some more headers can be used:
Access-Control-Allow-Methods: <method>[, <method>]*: Specifies which HTTP methods (like GET, POST, ...) for the actual request are allowed.Access-Control-Allow-Headers: <field-name>[, <field-name>]*: Specifies which headers can be used for the actual request.Access-Control-Allow-Credentials: true | false: Specifies if the actual request can contain credential information like a cookie or the HTTPAuthorizationheader. Note: If this is set totruethe headerAccess-Control-Allow-Origincan not contain a wildcard and a URI must be used.
CORS preflight requests
In the last section there was a mention of a CORS preflight request, but we haven't specified it yet.
A preflight request is an HTTP OPTIONS request done before the actual request is sent. It's used to determine if the actual request is safe to send. That's why the preflight request has more detailed options as seen above.
Not every actual request is preflighted. If one of the following statements is true, a preflight will be sent:
- The actual request contains a custom HTTP header.
- The actual request contains any other header set except
Accept,Accept-Language,Content-LanguageorContent-Typeand headers which are automatically set by the user agent (likeUser-AgentorConnection). - Any other method than HEAD, GET or POST is used.
- If POST contains a Content-Type header other than
application/x-www-form-urlencoded, multipart/form-data, or text/plain.
The browser automatically handles when to send a preflight or not. For the client using XMLHttpRequest this is fully transparent.
That's for the theory - now let's get started!
Node.js
For Node.js we use a module called restify-cors-middleware. Use npm install restify-cors-middleware to install it. The following code sample shows the usage:
const corsMiddleware = require(‘restify-cors-middleware`);

const cors = corsMiddleware({
	allowHeaders: [‘Authorization’]
});

// server from restify.createServer()
server.pre(cors.preflight);
server.use(cors.actual);
Straight and forward. At first we require the module and then call it to create a CORS middleware for restify. By default, without specifying more parameters it will allow all origins, all headers and all methods to access our Web API. Additionally, we want it to allow the Authorization header, which will carry a token for authentication.
Then we use server.pre(core.preflight); to allow CORS preflight requests. The actual request will then be inspected by server.use(cors.actual);. If everything was successful, our Web API will be called and return the result.
To see it in action, take a look here.
Let's move on to the ASP.NET Core 1.0 implementation.
ASP.NET Core 1.0
You remember the Startup.cs mentioned in part 2? This is the place where we are going to add CORS for ASP.NET Core 1.0 right now.
Let’s add the following lines to the method ConfigureServices within the Startup.cs:
public void ConfigureServices(IServiceCollection services)
{
  // Some other template code

	var corsBuilder = new CorsPolicyBuilder();
	corsBuilder.AllowAnyHeader();
	corsBuilder.AllowAnyMethod();
	corsBuilder.AllowAnyOrigin();
	corsBuilder.AllowCredentials();

	services.AddCors(options =>
	{
		options.AddPolicy("AllowAll", corsBuilder.Build());
	});
}
We use a CorsPolicyBuilder to build our custom CORS policy. For simplicity we allow everything.
As a serious reminder: For production use cases you should always consider who can actually call your Web APIs.
After configuration we add the policy to our services by using AddCors().
Last but not least, we need to configure the pipeline to use our policy by adding some code to the Configure method in Startup.cs:
public void Configure(IApplicationBuilder app, IHostingEnvironment env, ILoggerFactory loggerFactory)
{
	app.UseCors("AllowAll");

	// Other middlewares
}
It should be added as the first element in the pipeline. You can do this by adding the line as seen above to the top of the Configure method.
By the way, for allowing everything there is a shortcut method: app.UseCors(CorsOptions.AllowAll);. If this is used then the setup in ConfigureServices() is not needed. But it shows the options that can be used for configuring CORS. Thanks to @BasvanderVeeken for the hint. :-)
To see this in action, take a look here. Now we move on with token authentication.
A note on security
Watch out! Respecting CORS depends on your browser. If the browser does not implement the W3C CORS Recommendation, our client can't access all Web APIs he wants to. Fortunately, all modern browser respect CORS. But if a server communicates with our Web APIs, it won't care about CORS. By that, CORS will not protect our Web APIs but our clients.
To protect our Web APIs from unauthorized requests, we need another mechanism - so please stay tuned for part 5 about Token Authentication!