Node.js & ASP.NET Core 1.0: A Usage Comparison - Part 2: Web API Server Setup


Welcome back to the second part of the series! Don't forget that everything explained in this post can be seen in the open-source GitHub project. The post itself contains important code pieces only.
In this part we are going to create the Web API project for both Node.js and ASP.NET Core 1.0.
Let us start by creating a server - a hosting environment where our Web API and therefor our business use cases will live and the client can make requests to. Since we are on the web and we are using a JavaScript-based client, we want our Web API to accept and return JSON.
Node.js
For Node.js we’ll be using restify. Restify is framework providing both server and client components. Since we are going to create a server, we only need the server component. Don't forget to execute npm install restify. You can simply create a new restify server by using this code:
const restify = require(‘restify’);
const server = restify.createServer();
That's it. Restify now provides us a middleware based pipeline (for you .NET developers out there: like OWIN) where we can add functionality we want to execute when a request happens. But watch out! Since it is a pipeline order matters. Your middleware will be executed in the same order as you define it.
server.use(restify.queryParser());
server.use(restify.bodyParser());
We use restify’s queryParser and bodyParser to automatically convert the query string and a JSON body to nice and suitable JavaScript objects, so we can easily use them later.
Restify comes with a bunch of predefined middlewares which you can use out of box. Defining your own middleware is pretty easy. All you need is to implement a function like the one below:
function myTimeLoggerMiddleware(req, res, next) {
    var startTime = new Date().getTime();

    res.on('finish', () => {
        var endTime = new Date().getTime();
        console.log('Response generation length:', endTime - startTime, 'msec');
    });

    next();
}

server.use(myTimeLoggerMiddleware);
At first you need a function with the following signature: function (req, res, next). req contains all the information about the current request. res is used for responding to the request, the response, so to say. next is a function which will invoke the next middleware in your pipeline. In part 3 we are going to look into those parameters in more detail.
The function will be invoked when a request comes in. Then it will save the current time in startTime. With res.on we set up an event listener which listens to finish event. It is executed when the response was generated and will be sent back to the request. With the occurrence of the event we measure time again and write out a text to console which contains the amount of time needed to generate the response.
After setting up the event listener we simply call the next middleware in the pipeline. Those few lines are enough to implement a little time logger middleware. How cool is that? ;-)
Last but not least, we need to call server.listen(5000) to make restify listen on port 5000 for Web API requests.
ASP.NET Core 1.0
The server setup with ASP.NET Core 1.0 is pretty straight forward. There are several methods to create a project. If you want to start with a template, you can install Yeoman and the generator-aspnet. Second you use yo aspnet, select Web API project and yep, that’s it. The generator generates a Web API template which uses ASP.NET MVC 6. It already contains everything to parse query strings and JSON bodies.
Basically it creates a host with a Startup.cs file, you are familiar with from ASP.NET MVC 5 projects. In there, you find a middleware based pipeline just as in Node.js. If you have used ASP.NET MVC 5 you already know this pipeline concept from OWIN.
Since we created a little time-logging middleware in the Node.js section, we are going to do the same here: Create our own ASP.NET Core 1.0 middleware. To speak in code, here it is:
public class MyTimeLoggerMiddleware
{
    private readonly RequestDelegate _next;

    public ProcessingTimeMiddleware(RequestDelegate next)
    {
        _next = next;
    }

    public async Task Invoke(HttpContext context)
    {
        var watch = new Stopwatch();
        watch.Start();

        await _next(context);

        Console.WriteLine("Response generation length {0} msec", watch.ElapsedMilliseconds);
    }
}
You may have noticed one or two things we have already seen in Node.js: next which contains the next middleware and context which enables access to the request (context.Request) as well as the response (context.Response).
ASP.NET Core 1.0 middlewares are based on tasks which are await-able as seen in the code snippet above. The code itself is quite similar to Node.js' code: Create a StopWatch for time measurement, await the next middleware and write to console the elapsed milliseconds.
You may wonder why it is enough to await the next middleware only instead of waiting for all or waiting for a finish event as we did in Node.js. The pipeline is a sequence of middlewares, called one after the next like shown in this image:
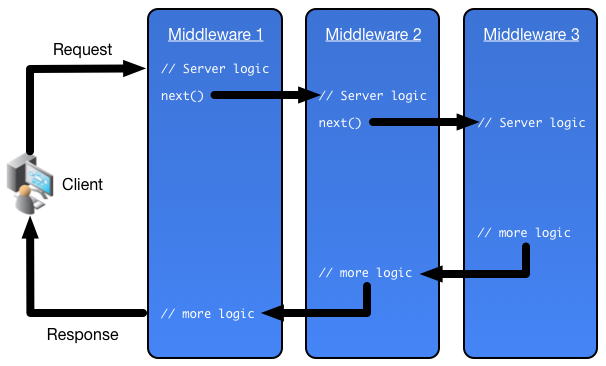
(Inspired by docs.asp.net)
By that our MyTimeLoggerMiddleware should be the very first so we can measure a whole request round trip.
To actually use our middleware we need to add it to the pipeline by locating the Configure method in Startup.cs and add it:
public void Configure(IApplicationBuilder app, IHostingEnvironment env, ILoggerFactory loggerFactory)
{
    // ...

    app.UseMiddleware<MyTimeLoggerMiddleware>();

    // ...
}
Essentially, that's all to measure the time in ASP.NET Core 1.0. :-)
A sidenote for using the yeoman generator which we used to create the initial Web API template. Even it's a Web API project the full blown ASP.NET MVC 6 will be loaded. By that you maybe get things you don't need for Web API like Razor View Engine. If you want to create thin Web APIs head over to my blog post showing you a how to.
Read the next blog article about Basic Routing!