Instantiate your own UI prefabs via GameObject menu
Learn how to create your own menu to instantiate your own (UI) prefabs to improve your workflow in the editor.


I'm currently working on a new little prototype game. Typical for any game, you start growing your UI prefabs library. Creating UI becomes somewhat tedious because every time you build something, you need to locate it via the Project tab. Wouldn't it be better to have it integrated into the Hierarchy right-click menu, the so-called GameObject menu?
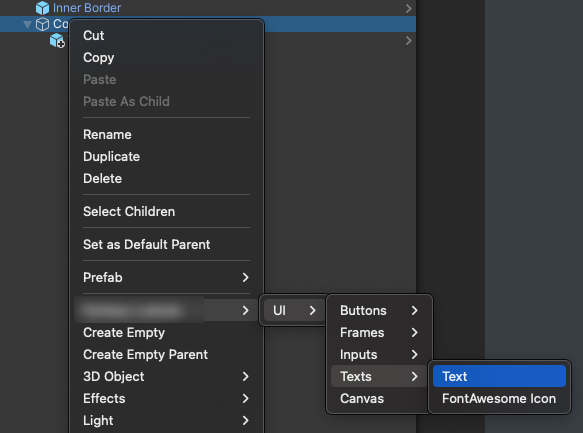
The picture above shows the menu for the little prototype game with our own UI library. Creating UIs this way feels more native and faster.
Let's explore how to do that!
Integrate into the GameObject menu
The first thing we need to do is to integrate into the menu. For that, we need an editor script, let's call it UiLibraryMenus:
public static class UiLibraryMenus
{
  private const int MenuPriority = -50;

  [MenuItem("GameObject/MyGame/UI/Buttons/Button", priority = MenuPriority)]
  private static void CreateButton()
  {
    Debug.Log("Hello World!");
  }
}
This little template will create one menu entry. It's important that the menu entry name starts with GameObject in order to integrate it into the right-click menu of the hierarchy. The priority specifies where it will be placed in that menu, -50 making it the first entry. Edward Rowe has written a nice article explaining the priorities further. After recompilation, you'll see the newly added entry:
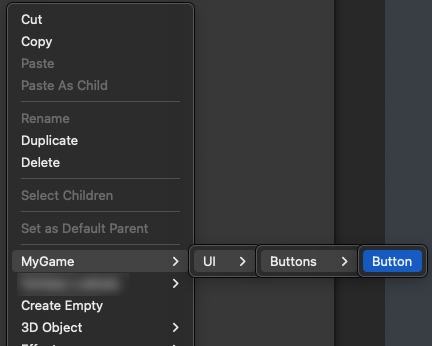
If you now click it, you'll see Hello World! in Unity's console.
Locate prefabs
So far, so good! The next step is to locate the prefabs that we want to instantiate.
There are different ways, in the next paragraphs, I'll explain them and their pros and cons.
AssetDatabase.LoadAssetAtPath
With AssetDatabase.LoadAssetAtPath we can load any asset to work with at editor time. We could use it to load any prefab and create an instance. However, since the API wants to have a path to load an asset it's absolutely not refactoring safe. If you move/reorganize your prefabs, you have to change all the paths as well. That's why I personally do not like this API.
Resources folder
The Resources folder along with its API is a special folder in Unity. It allows to load any resource at editor and run time and is not preloaded by Unity. However, it suffers from the same issue as AssetDatabase.LoadAssetAtPath. Also, the resources folder suffers from an additional issue: Unity does not do asset stripping with all items in that folder. Normally, Unity only includes used assets into your build by analyzing what's used in a scene and all the dependencies. But everything that is placed into the Resources folder will be packed into the build, no matter if used or not. Urgh. :-)
Also, Unity recommends not to use it anymore:

Addressables
A perfect replacement for the old Resources folder is Addressables. Ok, almost perfect, because Addressables do not work well in editor time, yet. It can be used with some hacks and if you're happy with it, go for it! For me, I'd like to wait a bit more until it's fully supported.
Using a ScriptableObject to locate prefabs
Now we've had three ways that won't work, are outdated, or are not really safe to use. What we actually can use is a ScriptableObject whose sole purpose is to gather all prefabs. Then, we only need to locate one ScriptableObject to have access to all the prefabs. The location of the ScriptableObjects can be done with AssetDatabase.LoadAssetAtPath. We still lose a bit of refactoring possibility, but we only need to keep track of one path and we can also provide an editor script for the SO and show an info text to remember to change the path if we ever move this SO.
It's important that you create the ScriptableObject outside of an editor folder. It must be a runtime script:
// Remove [CreateAssetMenu] when you've created an instance, because you don't need more than one.
[CreateAssetMenu(menuName = "MyGame/PrefabManager")]
public class PrefabManagerSO : ScriptableObject
{
#if UNITY_EDITOR
    public GameObject Canvas;
    public ButtonPrefabs Buttons;
    public TextPrefabs Texts;

    [Serializable]
    public class ButtonPrefabs
    {
      public GameObject Button;
    }

    [Serializable]
    public class TextPrefabs
    {
      public GameObject Text;
      public GameObject FontAwesomeIcon;
    }
#endif
}

#if UNITY_EDITOR
[CustomEditor(typeof(PrefabManagerSO))]
public class PrefabManagerSOEditor : Editor
{
  public override void OnInspectorGUI()
  {
    base.OnInspectorGUI();

    EditorGUILayout.HelpBox("If you move this file somewhere else, also change the path in UiLibraryMenus! ", MessageType.Info);
  }
}
#endif
In this script, we use the UNITY_EDITOR directive to have this code only available within the editor, because I don't want to use it as a general sink for any prefabs. It should only be there for UiLibraryMenus. Within the class, we just use some public fields and additional serializable classes for a better organization.
The second class is a custom editor with a little help box to remember where we may need to change a path if we move the SO.
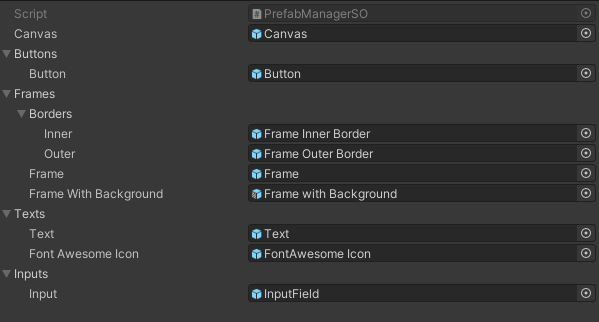
Now, let's create an instance of PrefabManagerSO via right-click menu of the Project tab and then choose MyGame -> PrefabManager.
Fill your instance with all the prefabs you need. In my case, it looks like this:
Locate the PrefabManager
Back in your UiLibraryMenus we now need to locate the instance of PrefabManagerSO:
public class UiLibraryMenus
{
  // ...

  private const string PrefabManagerPath = "Assets/_Game/ScriptableObjects/EditorExtensions/PrefabManager.asset";

  private static PrefabManagerSO LocatePrefabManager() => AssetDatabase.LoadAssetAtPath<PrefabManagerSO>(PrefabManagerPath);
}
First, we define the const PrefabManagerPath that points to your instance of the PrefabManagerSO. Adjust the path for your project.
Second, we define a method that uses AssetDatabase.LoadAssetAtPath to load the instance.
Instantiate a prefab
Finally, we're now able to create an instance of a prefab!
public class UiLibraryMenus
{
  // ...

  private static void SafeInstantiate(Func<PrefabManagerSO, GameObject> itemSelector)
  {
    var prefabManager = LocatePrefabManager();

    if (!prefabManager)
    {
      Debug.LogWarning($"PrefabManager not found at path {PrefabManagerPath}");
      return;
    }

    var item = itemSelector(prefabManager);
    var instance = PrefabUtility.InstantiatePrefab(item, Selection.activeTransform);

    Undo.RegisterCreatedObjectUndo(instance, $"Create {instance.name}");
    Selection.activeObject = instance;
  }

  // Same method from the start of the blog post.
  [MenuItem("GameObject/MyGame/UI/Buttons/Button", priority = MenuPriority)]
  private static void CreateButton()
  {
    SafeInstantiate(prefabManager => prefabManager.Buttons.Button);
  }
}
First, we define the method SafeInstantiate. Its parameter is a Func<PrefabManagerSO, GameObject> itemSelector . It's a callback to select the actual item we want to instantiate. The callback will get the instance of the PrefabManagerSO and will return any GameObject to instantiate.
Within the method, we use LocatePrefabManager to get the instance. Then we check if it could be loaded. If you got your path wrong or moved the instance in the meantime, then prefabManager will be null.
If the instance was loaded successfully, we call the itemSelector to get the actual prefab to instantiate. Then, we use PrefabUtility.InstantiatePrefab to create an instance. The first parameter is the prefab to instantiate and the second is the parent. Selection.activeTransform is the currently selected transform in the hierarchy or null.
Careful here: You could also use GameObject.Instantiate but then it won't be a linked prefab anymore!
For a better editor integration, we then use Undo.RegisterCreatedObjectUndo tso we can easily use Edit -> Undo to undo the object creation.
Lastly, we use Selection.activeObject to select the newly created instance.
Additional validation function
Since we're instantiating UI prefabs, we want to make sure, that we only can instantiate them, when we have a canvas in any parent object. We can use a validation function to check that:
public class UiLibraryMenus
{
  // ...

  [MenuItem("GameObject/MyGame/UI/Buttons/Button", true)]
  private static bool SelectionHasCanvasValidate() =>
      Selection.activeGameObject && Selection.activeGameObject.GetComponentInParent<Canvas>();
}
This is a very simple menu validator function. If it returns true, the menu item can be used. If it returns false, the menu item won't be visible. Now we can guarantee that our UI prefabs can only be instantiated within a canvas.
You could also go the other way round and create a canvas before if there's non. That's up to you. :)
Cheers!