Unity Tip: Level Selection Editor Window
Learn how to create a little utility editor window to load your own levels in a comfortable way.

TL;DR at the end with the whole script.
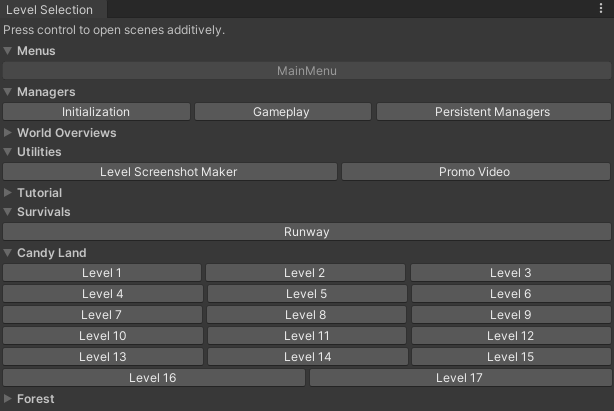
In Bug-A-Ball we have a little Editor Window that shows all levels, menus, utility scenes, as you can see in the screenshot below:
This little editor window categorizes the levels and offers a button to directly load the scene into the editor. Additionally, if you hold down the control button, it will load additively.
Bug-A-Ball has some ScriptableObjects to organize levels into level packs that are used in the editor window. However, in this blog post, we're going to explore the basics needed to create such a window that can be adapted to your level organization.
Create the editor script
In a folder called Editor create a new script called LevelSelectionEditorWindow.
using UnityEditor;
using UnityEditor.SceneManagement;
using UnityEngine;

public class LevelSelectionEditorWindow : EditorWindow
{
  [MenuItem("Bug-A-Ball/Level Selection Window")]
  private static void ShowWindow()
  {
    var window = GetWindow<LevelSelectionEditorWindow>();
    window.titleContent = new GUIContent("Level Selection");
    window.Show();
  }
}
The MenuItem attribute will create a menu entry called so the window can be opened. The method ShowWindow will then open the window.
React to control press
Next thing is that we want know when control has been pressed. Add the following code to the class:
private bool _openAdditive;

private void ModifierKeysChanged()
{
  if (hasFocus)
  {
    Repaint();
  }
}

private bool IsControlPressed()
{
  var currentEvent = Event.current;
  return currentEvent.control;
}

private void OnGUI()
{
  _openAdditive = IsControlPressed();

  EditorGUILayout.LabelField(
    _openAdditive
      ? "Will open scenes additively."
      : "Press control to open scenes additively."
  );
}
First, we define a field _openAdditive so we know if later a scene should be opened additively.
Then we use the Unity callback ModifierKeysChanged that is always called whenever a modifier key has been pressed or released. If that's the case, then we check if our window has the focus and if so we trigger a repaint.
Repaint will then automatically call OnGUI to draw our editor window. Here we check with IsControlPressed if control is has been pressed and then create a label field containing some text.
Scrollable editor window
Depending on your game and Unity layout it may be necessary to make the editor window scrollable. Luckily, Unity has something built in:
private Vector2 _scrollPosition;

private void OnGUI()
{
  // Other code

  _scrollPosition = EditorGUILayout.BeginScrollView(_scrollPosition);

  RenderScenes(); // not yet created!

  EditorGUILayout.EndScrollView();
}
First, we create a new field _scrollPosition that stores the current scroll position. In OnGUI we use EditorGUILayout.BeginScrollView to begin a scrollable view. At the end, we need to call EditorGUILayout.EndScrollView. Everything in between will be scrollable. Please note, we have not implemented RenderScenes yet, that's the next step!
Prepare foldouts
As you have seen in the little demo video at the beginning of this post, you can see that the editor windows has some foldouts. Let's prepare two little methods to handle that:
private bool BeginFoldoutGroup(string groupName)
{
  var show = EditorPrefs.GetBool($"foldout_{groupName}", false);

  return EditorGUILayout.BeginFoldoutHeaderGroup(show, groupName);
}

private void EndFoldoutGroup(string groupName, bool show)
{
  EditorGUILayout.EndFoldoutHeaderGroup();

  EditorPrefs.SetBool($"foldout_{groupName}", show);
}
The methods are for beginning and ending a foldout header group. In addition we save/load the state of each group via EditorPrefs to the UI state is saved and will be consistent when restarting the editor. That's not necessary, it's just a bit more convenient to use.
Prepare a button to open a scene
Last preparation before we can render some scenes is to create a method that will create a button to open a scene. It could look like this:
private void OpenSceneButton(string label, string sceneName)
{
  var sceneFile = $"Assets/_Game/Scenes/{sceneName}.unity";

  EditorGUI.BeginDisabledGroup(IsSceneOpen(sceneFile));

  if (GUILayout.Button(label))
  {
    if (!EditorSceneManager.SaveCurrentModifiedScenesIfUserWantsTo())
    {
      return;
    }

    EditorSceneManager.OpenScene(sceneFile, _openAdditive ? OpenSceneMode.Additive : OpenSceneMode.Single);
  }

  EditorGUI.EndDisabledGroup();
}

private bool IsSceneOpen(string sceneFile)
{
  for (var i = 0; i < EditorSceneManager.sceneCount; i++)
  {
    if (EditorSceneManager.GetSceneAt(i).path == sceneFile)
    {
      return true;
    }
  }

  return false;
}
In this method we create a variable sceneFile that points to your physical Unity scene. Please note, that for your scripts you may need adapt the base path. In Bug-A-Ball all scenes are located under Assets/_Game/Scenes organized in subfolders.
Next, we use IsSceneOpen to check if the scene is loaded in the editor using EditorSceneManager.GetActiveScene. If that's the case, the method returns true and thus EditorGUI.BeginDisabledGroup will disable the UI, so you basically cannot reload the same scene.
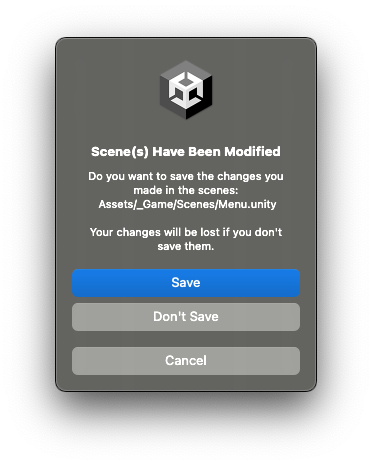
Then, using GUILayout.Button we create a new button with the given label.If the button is pressed, the code in the if-statement will execute. In here, we check via EditorSceneManager.SaveCurrentModifiedScenesIfUserWantsTo if there is a modified scene and if the user wants to save it. If the user does (or not) save it, it will return false, skipping the return in the if-statement and EditorSceneManager.OpenScene will be called opening the desired scene. If the user cancels the dialog, the if-statement will execute and thus not open the scene. Depending on _openAdditive the scene is either loaded additively or as a single scene.
EditorSceneManager.SaveCurrentModifiedScenesIfUserWantsToRender scene categories with buttons
Now we've everything in place to actually render some categories with buttons. Remember the method RenderScenes we've called but not implemented yet? Now it's time!
private void RenderScenes()
{
  RenderMenus();
  RenderWorld1();
}

private void RenderMenus()
{
  var show = BeginFoldoutGroup("Menus");

  if (show)
  {
    EditorGUILayout.BeginHorizontal();
    OpenSceneButton("MainMenu", "Menus/Main");
    OpenSceneButton("Settings", "Menus/Settings");
    OpenSceneButton("Character", "Menus/Character");
    EditorGUILayout.EndHorizontal();
  }

  EndFoldoutGroup("Menus");
}

private void RenderWorld1()
{
  var show = BeginFoldoutGroup("World 1");

  if (show)
  {
    EditorGUILayout.BeginHorizontal();
    OpenSceneButton("Level 1", "World1/Level1");
    OpenSceneButton("Level 2", "World1/Level2");
    OpenSceneButton("Level 3", "World1/Level3");
    EditorGUILayout.EndHorizontal();

    EditorGUILayout.BeginHorizontal();
    OpenSceneButton("Level 4", "World1/Level4");
    OpenSceneButton("Level 5", "World1/Level5");
    OpenSceneButton("Level 6", "World1/Level6");
    EditorGUILayout.EndHorizontal();
  }

  EndFoldoutGroup("World 1");
}
This is just a sample implementation and shows to use the methods we've prepared. In RenderScenes we actually call two more methods, one for each group we want to show in the editor window.
In each group, for example, RenderWorld1 we use BeginFoldoutGroup to begin a foldable group. Now we need to take a look at the result saved to show. If show is true we can render the content otherwise it will be skipped.
If the group is shown, for some more structure, we can use EditorGUILayout.BeginHorizontal and EditorGUILayout.EndHorizontal to make a horizontal layout that contains three OpenSceneButtons loading the defined scene.
Nice! Now we have a little window that can open our levels.
Where to go from here?
Depending on your structure, you can do several things. In Bug-A-Ball we have ScriptableObjects for organizing our level structure, so in our editor window, we load all the level packs and render all necessary buttons automatically.
You can also use AssetDatabase.FindAssets("t:scene", null) to find all Unity scenes and use your physical folder structure for automatically creating groups and scene buttons. It's up to you now, have fun!
TL;DR - The whole script
using UnityEditor;
using UnityEditor.SceneManagement;
using UnityEngine;

public class LevelSelectionEditorWindow : EditorWindow
{
  [MenuItem("Bug-A-Ball/Level Selection Window")]
  private static void ShowWindow()
  {
    var window = GetWindow<LevelSelectionEditorWindow>();
    window.titleContent = new GUIContent("Level Selection");
    window.Show();
  }

  private bool _openAdditive;
  private Vector2 _scrollPosition;

  private void ModifierKeysChanged()
  {
    if (hasFocus)
    {
      Repaint();
    }
  }

  private bool IsControlPressed()
  {
    var currentEvent = Event.current;
    return currentEvent.control;
  }

  private void OnGUI()
  {
    _openAdditive = IsControlPressed();

    EditorGUILayout.LabelField(
      _openAdditive
        ? "Will open scenes additively."
        : "Press control to open scenes additively."
    );

    _scrollPosition = EditorGUILayout.BeginScrollView(_scrollPosition);

    RenderScenes();

    EditorGUILayout.EndScrollView();
  }

  private bool BeginFoldoutGroup(string groupName)
  {
    var show = EditorPrefs.GetBool($"foldout_{groupName}", false);

    return EditorGUILayout.BeginFoldoutHeaderGroup(show, groupName);
  }

  private bool EndFoldoutGroup(string groupName, bool show)
  {
    EditorGUILayout.EndFoldoutHeaderGroup();

    EditorPrefs.SetBool($"foldout_{groupName}", show);
  }

  private void OpenSceneButton(string label, string sceneName)
  {
    var sceneFile = $"Assets/_Game/Scenes/{sceneName}.unity";

    EditorGUI.BeginDisabledGroup(EditorSceneManager.GetActiveScene().path == sceneFile);

    if (GUILayout.Button(label))
    {
      if (!EditorSceneManager.SaveCurrentModifiedScenesIfUserWantsTo())
      {
        return;
      }

      EditorSceneManager.OpenScene(sceneFile, _openAdditive ? OpenSceneMode.Additive : OpenSceneMode.Single);
    }

    EditorGUI.EndDisabledGroup();
  }

  private void RenderScenes()
  {
    RenderMenus();
    RenderWorld1();
  }

  private void RenderMenus()
  {
    var show = BeginFoldoutGroup("Menus");

    if (show)
    {
      EditorGUILayout.BeginHorizontal();
      OpenSceneButton("MainMenu", "Menus/Main");
      OpenSceneButton("Settings", "Menus/Settings");
      OpenSceneButton("Character", "Menus/Character");
      EditorGUILayout.EndHorizontal();
    }

    EndFoldoutGroup("Menus");
  }

  private void RenderWorld1()
  {
    var show = BeginFoldoutGroup("World 1");

    if (show)
    {
      EditorGUILayout.BeginHorizontal();
      OpenSceneButton("Level 1", "World1/Level1");
      OpenSceneButton("Level 2", "World1/Level2");
      OpenSceneButton("Level 3", "World1/Level3");
      EditorGUILayout.EndHorizontal();

      EditorGUILayout.BeginHorizontal();
      OpenSceneButton("Level 4", "World1/Level4");
      OpenSceneButton("Level 5", "World1/Level5");
      OpenSceneButton("Level 6", "World1/Level6");
      EditorGUILayout.EndHorizontal();
    }

    EndFoldoutGroup("World 1");
  }
}
Cheers!